Buy Johnson Outboard Parts

Announcement

Collapse
No announcement yet.

1976 25 HP Johnson 25E76E .....shift Rod Bushing Question

Collapse
X
 
  • Filter
  • Time
  • Show
Clear All
new posts

  • 1976 25 HP Johnson 25E76E .....shift Rod Bushing Question

    Question for someone who has actually worked on a 197676 Johnson 25 HP #25E76E

    I have taken out the shift rod bushing and seals under it.
    I have replaced the o-ring in the shift rod bushing.
    BUT....the little fat o-ring that goes in the bushing is tight from side to side..but it is not thick enough to fill the cavity completely in the bushing.
    That is, the bushing is a little longer...
    So....when the bushing is driven in and (sits on a domed washer, by the way) ....there is a space there ....between the washer and the o-ring.
    That is, the o-ring is going to "float" in the bushing cavity..
    Some say that I can drive the bushing down to compress the oring so as to provide friction for the shift rod......
    I cannot.
    The bushing bottoms out and will not compress the o-ring.

    Question...
    Is this normal?
    Thanks for the help

  • #2
    Since we are somewhat lacking as of yet the year 197676, I will assume that the mentioned year is a typo as your model indicates the year of 1976.

    If you are installing the proper part numbered "O" Ring, do not be concerned about compressing it. If the outer portion of the "O" Ring is a tight fit against the inner wall of the brass housing, the tight fit of the shift rod will cause the outer portion of the "O" Ring to expand slightly resulting in a even tighter fit.

    The top and bottom portion of the "O" Ring being exposed to a slight bit of play is of no consequence and mirrors the factory installation.

    The domed washer you speak of was at one time a flat fiber washer.... the dome resulting from being exposed to internal lower unit pressure over a period of years. The lower outer edge of the brass housing seals tightly against that fiber washer resulting in a perfect leak proof seal.

    If the "O" Ring did not have that slight bit of vertical play, the "O" Ring would be squashed slightly and you would never be able to slip the shift rod through it.

    Sounds normal to me.
    Last edited by Joe Reeves; 03-22-2017, 09:39 PM.

    Comment


    • #3
      shift rod seal question

      Thank you for your kind response to my question.
      I've been trying to stop a leak in my lower unit for a while.
      The lower case oil mixed with water leaks out of a weep hole that is common to the shift rod bushing and the drive shaft seal.
      I just put it back together for the 4th time and this time I put some 3M gasket sealant under the water pump plate...
      I read my service manual and I noticed that I was supposed to do that and didnt see those instructions until I really read it in detail.
      Maybe that will stop water getting into the gearcase.
      I dont have a pressure or vacuum test unit ....
      Tomorrow I'll take the boat to the River to see if my 4th reseal will work.
      Thanks again for the info on the shift rod bushing.
      If you dont mind, I'll keep you posted.

      Comment


      • #4
        The sealer between the water pump plate and the gearcase and also between the impeller housing and the plate is to prevent the water pump from possibly drawing air...... it has nothing to do with preventing water from leaking into the gearcase or preventing gearlube from leaking out.

        Leakage can occur only at: The shift "O" Ring area, The driveahaft seal under the water pump, The propshaft seal and/or "O" Ring, The shift lever Philips Screw gasket at the skeg area if it exists.

        NOTE: If that philip screw exists... DO NOT remove it unless you know exactly what you're doing as that is a long pivot screw that when removed allows the shift lever to drop away resulting normally in a dismantling of the gearcase to resolve.

        Comment


        • #5
          Gearcase propeller assembly

          Thanks....great advice and help.
          I took my little boat to the River (Sabine River) today and gave it a test run....caught some huge white bass, by the way...they bite all the time this time of year...anyway....
          I'll know tomorrow if the Lower Unit leaks....got home after dark and tomorrow it will be warm enough to heat the oil up and every time that has happened.... oil (with water) comes out of the weep hole.
          I'm worried from your comments though, because I have never replaced the prop shaft seal.
          I've taken the gearcase apart 3 or 4 times now and have noticed the shaft seal in the gearcase prop assembly.
          I believe I'm correct in saying that the prop shaft seal is only available if I buy the whole assembly.....very expensive.
          Someone told me that I could take the assembly apart and have the seal measured and buy it that way....which is what I would do.....
          Question...
          the prop shaft lip seals are toward the gearcase (to keep oil in)....I have never noticed oil leaking from around the prop shaft....
          Can I discount that seal as being the culprit?
          What do you think?

          Comment


          • #6
            The propshaft seal.... If that item is leaking, there will be gearlube at that point and it will be obvious. If you do not see oil leaking from that seal, it's okay.

            Yes, you are correct (I just checked) the seal is not available separately. The unit's part number is 383757 and lists for about $150. I consider that a scam to prevent you from repairing... buy a new engine is their plan!

            I still have two of those units in stock (new) and should you ever need one, I'd discount it to $100 and cover shipping.

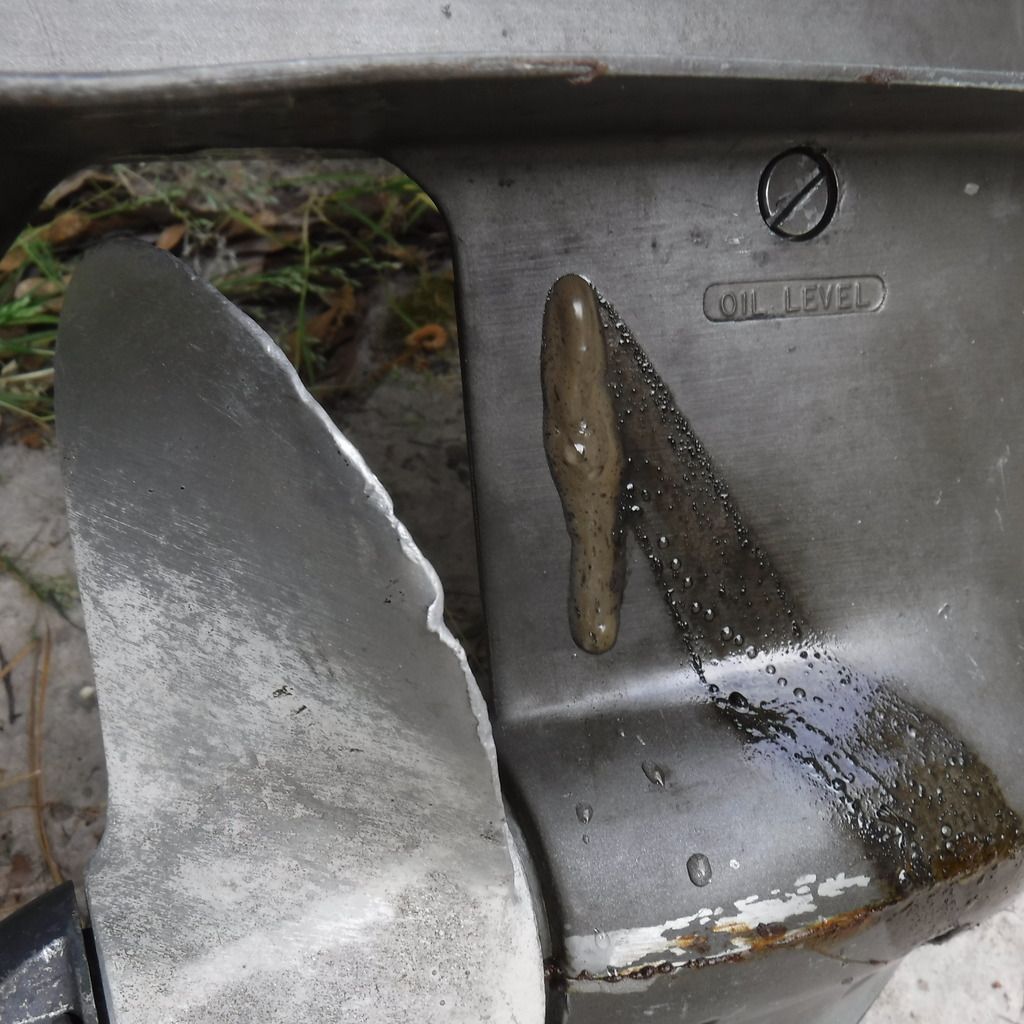
            NOTE.... The weeping hole is actually a drain hole, designed so that water doesn't get trapped in cavities within the gullies inside the housings in world areas that experience freezing weather. What you're seeing may be simply water mixed with exhaust soot draining down through the long soot coated exhaust areas (black). However, I feel sure that you've actually checked the lower unit for water, discoloration, etc and what you see dripping is actually gearlube.

            To test.... You don't need the gauges, especially the vacuum gauge. Simply have the unit empty... leave either the drain or oil level screw off... Apply 7 to 12 psi of pressurized air to the hole (No More Than That)... Use a short piece of rubber fuel hose between the air nozzle and the hole for sealing purposes or cover the hole with a rag, forcing the nozzle into it, just seal it somehow.

            If that unit is leaking, you'll see it and hear it... that test has never failed me.
            Last edited by Joe Reeves; 03-24-2017, 09:11 AM.

            Comment


            • #7
              lower unit test reply

              Thank you for your kind and knowledgeable reply.
              I'll take your advice and pressure test the unit after a clean up inside the gullies.

              Comment


              • #8
                shift rod bushing flat washer question

                One more thing ....and thanks
                Regarding the shift rod seal.
                The new washer under the bushing (not the o-ring) is flat on one side and domed on the other...
                Does the flat side go against the casting and the domed side against the bushing.
                You seemed to suggest in your earlier posts to me that the NEW flat washer is flat and becomes domed over time....
                My New washer is flat on one side and has a slight dome to it on the other.

                Comment


                • #9
                  Strange... All of the washers I've come across have been flat on both sides. I'll look into that in the morning... alarm is set for the night, don't want to wake all the neighbors up.

                  Comment


                  • #10
                    My books, both the 1976 25hp Johnson parts book and the service manual are OMC factory manuals, specifically for your model engine.

                    The parts book shows a flat washer and the picture is large and clear enough to see that it is a flat washer.

                    The service manual.... I read through that entire section so as to refresh my memory. The only mention of the washer is where it states to install the washer, O ring, and bushing, using the special tool (actually nothing more than a customized punch).

                    There is no mention of one side of the washer being domed or that it should be installed in a particular way.

                    If you have the old washer, study it to see which way it may have been installed. I've been in this line of work with OMC/Bombardier (30+ years) and every one of those shift bushing washers I've encountered were flat. Frankly I see no reason for it to be domed.

                    Its purpose is to seal the sides of the brass bushing.... if the side of the brass bushing or that gearcase area was scored, leakage could alide by it... the gasket would prevent that leakage due to the bushing pressing down on it. Actually the shift rod hole in the washer could be twice the size of the rod and that wouldn't affect its operation.

                    Comment


                    • #11
                      shift rod question

                      Well, I'll be able to pressure test the unit today and see just where the leakage is....
                      I had a friend of mine look at the bushing and seals...he is 78 and was a Mercury mechanic back in the day for a bunch of crabbers and shrimp boat workers down on the coast of louisiana.
                      He has all the Johnson and Mercury manuals back to 1972...they are on a dusty shelf in his barn.
                      We tapped the bushing and pulled it out.
                      The flat washer falls into the casting hole very easily....we decided that the domed side should go towards the bushing.
                      Of course, the o-ring is not thick enough to fill the cavity in the bushing and actually touch the washer.
                      It does have to be pushed into the bushing and is tight from side to side.
                      We have talked about this before.
                      When I installed the bushing and seal this time I put some 3M #847 sealant around the bushing....you can see it ooze up around the bushing when I tapped the bushing or around the shaft.....I'll send you the bushing, o-ring and seal so you can look at it.....
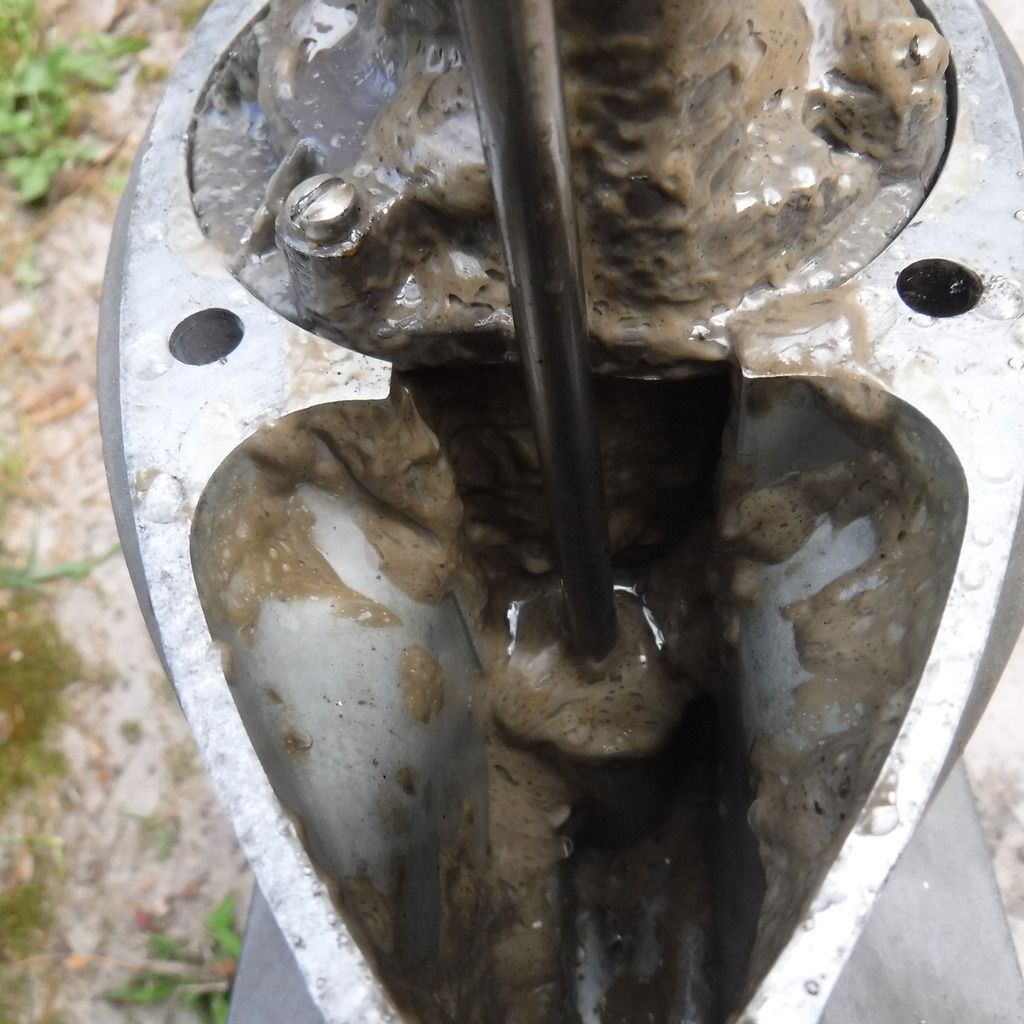
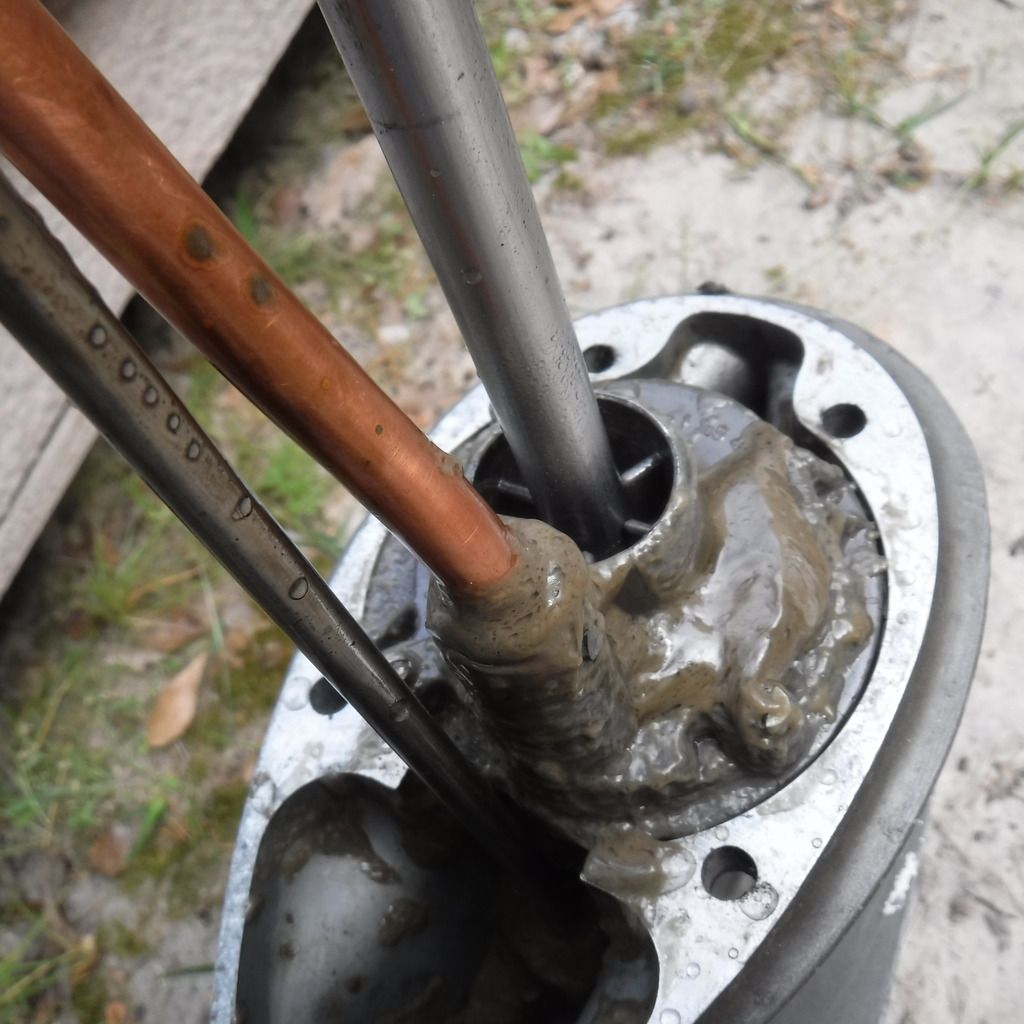
                      I'm going to try to attach a few pictures of what the inside of the lower unit looks like after taking it off when its leaking.....
                      I know you have better things to do than worry about this....so thanks.
                      I found a guy near Austin, Tx that works on vintage outboards and I'll take it over to him if I cant get to the bottom of this myself....he's 6 hrs away.


                      Comment


                      • #12
                        Leak Found!

                        ou have helped me so much.
                        I know your posts take some time and I really appreciate it.
                        I wantec to let you know first... as I've been talking to some other forums.
                        Pressure tested today with a Walmart bicycle pump and a makeshift connection.
                        The shift rod bushing is holding pressure well.
                        No bubbles out of the prop seal.
                        I took the water pump impeller housing off and the drive shaft seal is leaking....
                        Bubbles.....actually a small spray of water.....big leak.
                        I removed the seal and there is a gouge in the casting hole in which the seal sits.
                        It extends from the middle of the hole to top of the casting....
                        The casting hole is good the rest of the way down.
                        If I drive the seal all the way down into the hole...it will be below the gouge.
                        If you look closely, you can see a ring around the casting where the old seal was placed.......below the gouge.
                        It was driven down below the gouge.
                        The gouge is probably an old mistake.
                        So.....I'm going to put another drive shaft seal in and drive it down past the gouge.
                        That should do it.
                        I inherited this engine from my cousin.
                        It belonged to his Dad and there has been some maintenance done over the years....
                        I missed the gouge.
                        It's exactly the width of a seal puller....someone was not careful.
                        I didn't have to take the shift rod out (open the gearcase).....that's a pain.
                        I'll put all together and give it another pressure test and let you know...
                        You have been a very kind and knowledgeable resource and I'm a fan.
                        thanks
                        You racked up some good Karma, my friend.
                        Darryl

                        Comment


                        • #13
                          still leaking...

                          The drive shaft seal is still leaking around the outside (between the seal's metal rim and casting.
                          I've done this so far...
                          1.) Put 3M # 847 around the seal....not a lot cause I didnt want to gum up the needle bearing below the seal....dont know it that could happen however.
                          2.) driven the seal all the way down as far as it can go and put some sealant around the casting hole and driven another seal on top of it....still leaks.
                          Question
                          Do you know of a seal that has a rubber look to it ...so there would be a elastomer to casting make up....?

                          Also, do you think that I can have the casting hole dressed up to receive another ....say oversized seal.....
                          Just asking.

                          Comment


                          • #14
                            Other than cleaning the seal cavity thoroughly with either lacquer thinner or acetone and then using either JB Weld or MarineTex, preferably MarineTex (available at most marine type stores/dealerships, etc) as that substance dries stronger and harder than the metal it adheres to..... smear a little bit around the walls that the seal sits in... and also smear a little bit around the outer surface of the seal, then install the seal and let it sit overnight.

                            The down side is that it's unlikely that seal will ever come out again if this scenario failed to seal.

                            My other suggestion would be to contact a reliable machine shop to see if they have a solution.

                            Comment

                            Working...
                            X